Find out how we can help
make the place you live,
the place you love.

The ultimate guide to kitchen regrouting

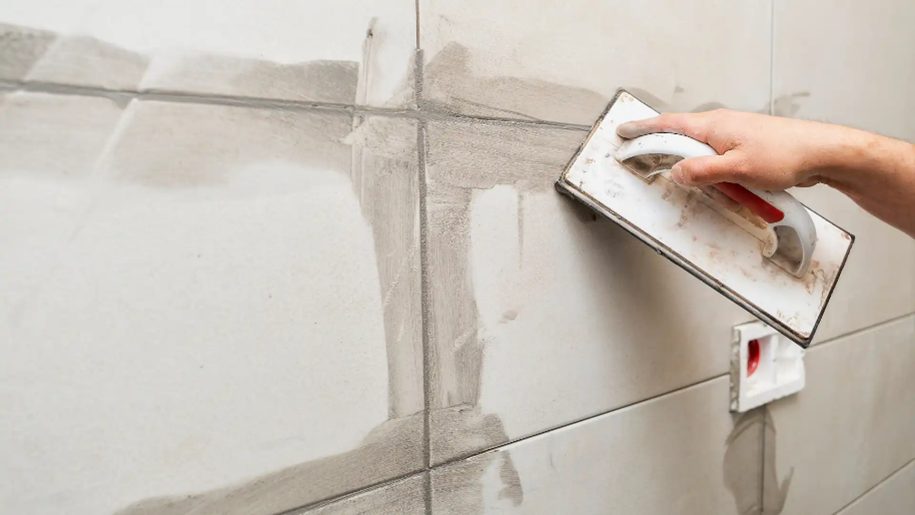
Is your kitchen looking a bit worse for wear? Faded grout lines and stained tiles can make even the nicest space feel dull and dated. The good news is, you don’t need a full renovation to bring back that fresh, clean look. Regrouting is a simple, cost-effective way to make your tiles look brand new again.

This guide walks you through everything you need to know about how to regrout kitchen tiles, from the tools you’ll need to the steps that’ll make your kitchen shine again.

Key takeaways


  • Regrouting is an easy, cost-effective way to make your kitchen tiles look brand new.
  • The process includes removing old grout, cleaning, applying new grout, and sealing it for protection.
  • Choosing the right grout type, sanded, unsanded, or epoxy, ensures a durable and lasting finish.
  • Having the proper tools and taking your time helps achieve that smooth, professional look.
  • Regular cleaning and resealing will keep your grout fresh and your kitchen looking its best.

When should you regrout kitchen tiles?

Grout doesn’t last forever, and in high-traffic areas like the kitchen, it can start showing its age faster than you’d think. Every day cooking, spills, and steam slowly break it down, leaving your grout looking tired and uneven.

Here are some clear signs it’s time to regrout:

  • Cracked, discoloured, or missing grout between tiles.
  • Stains that won’t budge, no matter how much you scrub.
  • Persistent mould or a damp, musty smell.

If you’ve noticed any of these, a fresh application of grout can make your kitchen look new again, without the cost of a full renovation.

Tools and materials you'll need to regrout your kitchen

Before you start regrouting, make sure you’ve got the right gear on hand. Here’s what you’ll need:

  • Grout saw or oscillating tool: to carefully remove the old grout without damaging your tiles.
  • Vacuum or brush: for cleaning out the joints and getting rid of any leftover dust or debris.
  • Grout float and sponge: to apply the new grout smoothly and clean up any excess.
  • Bucket and mixing paddle: for mixing your grout to the right consistency.
  • New grout: choose between sanded, unsanded, or epoxy, depending on your tile type and joint size.
  • Sealant and applicator: to protect your new grout from moisture and stains once it’s dry.
  • Safety gear: gloves, goggles, and painter’s tape to keep things tidy and protect yourself while you work.

Having the right tools not only makes the process smoother but also helps you get that crisp, professional-looking finish.


What type of grout should you use in kitchens?

Choosing the right grout makes all the difference in both look and longevity. Sanded grout suits kitchen floors and wider joints, offering strength and durability. For walls and splashbacks, unsanded grout gives a smoother, cleaner finish. If you want the toughest option, epoxy grout is waterproof, stain-resistant, and perfect for busy kitchens. When it comes to colour, go light for a seamless look or darker for contrast and easier maintenance.

Step by step guide on how to regrout kitchen tiles

Regrouting your kitchen might sound like a big job, but with the right tools, a bit of patience, and some careful technique, it’s totally doable. Here’s a step-by-step guide to help you get great results without the stress.

Step 1. Inspect the area

Before you start, take a close look at your tiles. Check for any loose or cracked ones that might need to be repaired or replaced first. You don’t want to grout over existing damage. Make sure the area is dry and clean, especially around benchtops or splashbacks.

Step 2. Remove the old grout

Use a grout saw or oscillating tool to carefully scrape out the old grout between the tiles. Take your time to avoid chipping the edges. If you’re working near delicate surfaces like splashbacks, painter’s tape can help protect the tile edges.

Extreme care must be taken to not chip the edges of the tiles, or cut too deep which could damage waterproofing membranes or under-floor heating elements. If you are not confident call your local GroutPro specialist.

Step 3. Clean the surface thoroughly

Once all the old grout is gone, vacuum or brush out the joints to remove any leftover dust and debris, and give the tiles a good clean to remove grease and dirt. A clean tile surface ensures the new grout adheres properly.

Step 4. Mix the new grout

Follow the grout manufacturer’s instructions for mixing; consistency is key here. You’re aiming for something smooth and lump-free, similar to thick peanut butter. If you’re working on a large area, only mix what you can apply in about 30 minutes to avoid it drying out too fast.

Step 5. Apply the grout

Use a the correct float to spread the grout across the tiles at a 45° angle. Work diagonally across the joints so the float presses the grout deep into the gaps. Apply firm, even pressure, and make sure every joint is filled. Work in small sections so you can smooth and clean excess away as you go.

Step 6. Clean up excess

After about 10–15 minutes, the grout will start to set slightly. Use a damp (not soaking wet) sponge to gently wipe away any excess from the tile surface. Rinse the sponge regularly and keep the strokes light; too much water can weaken the grout before it cures. Once it starts to dry, you might see a light haze on the tiles. That’s normal; it can be buffed off later with a dry cloth.

Step 7. Let the grout cure

Leave the grout to dry for at least 24 hours, or up to 48 hours for larger areas or humid environments like kitchens. Avoid walking on the area or splashing water until it’s fully cured.

Step 8. Seal the grout

Once the grout is fully dry, apply a quality sealant to protect it. Use a small applicator brush or roller and run it evenly along the grout lines. Allow it to dry completely before using the area again. Sealing not only makes your grout last longer but also makes cleaning easier down the track.

Maintaining your newly regrouted tiles

Once you’ve finished regrouting your kitchen, maintenance is key to ensure you don’t have to circle back and do it again any time soon. Here are a few good habits that will have a huge effect on your new grout:

  • Clean regularly using a mild, pH-neutral cleaner. Avoid bleach or acidic products that can damage grout.
  • Reseal every 12–18 months to protect against moisture, stains, and everyday wear.
  • Wipe up spills straight away to prevent discolouration or grime build-up.
  • Use soft brushes or cloths instead of abrasive scrubbers to keep tiles and grout looking smooth and fresh.

With a little regular care, your kitchen will keep that just-regrouted look for years to come.

Ready to bring your kitchen back to life?

A kitchen regrout can completely transform your space. No renovation required. It’s one of those small upgrades that makes a big difference to how your home feels every day.

If you’d rather skip the mess and get a perfect finish, talk to your local GroutPro team. Our specialists can restore your kitchen tiles quickly and professionally, leaving your space looking good as new.

The Progroup - “making the place you live, a place you love.”

Back to top